To follow this article, first create a Windows application by selecting File->New->Project->Visual C# Projects->Windows Application template from Visual Studio .NET project templates. I give my project name IntroToCR.
Adding a Report to a Project
Crystal Report is a part of Add New Item templates available in Visual Studio. To add a report to the project, add a new item by Right Clicking on the project in Solution Explorer and selecting Add->Add New Item->Crystal Report as you can see in Figure 1. I change the name of the report to Customers because we will be displaying customers related information from Northwind database.
Now click the Open button.
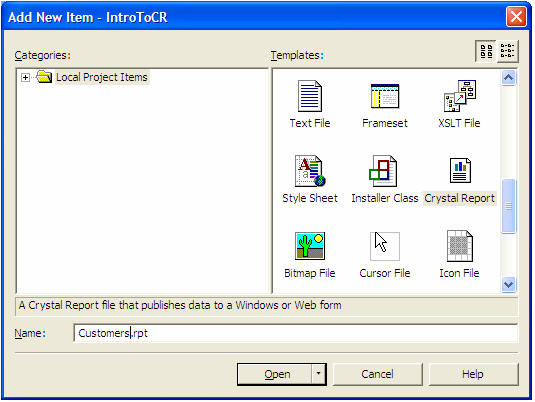
Figure 1. Adding a Report to the Project
The next step is to select the report document type from Crystal Report Gallery. As you can see from Figure 2, Crystal Report Gallery provides three options Using the Report Expert, As a Blank Report, or From an Existing Report.
For our first application, lets keep all options as default. I will be discussing rest of the options in my following articles.
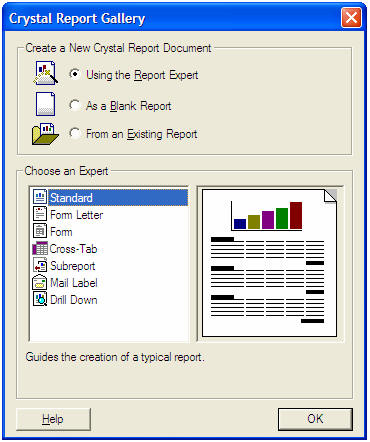
Figure 2. Selecting a report type.
By clicking the OK button adds Customers.rpt file to the project and launches Standard Report Expert wizard as you can see in Figure 3, where you can select a data source. The Standard Report Expert wizard has 8 different tabs. I will discuss these tabs in more details in my following articles. The main purpose of this article is to show you how to create your first report in a few simple and quick steps.
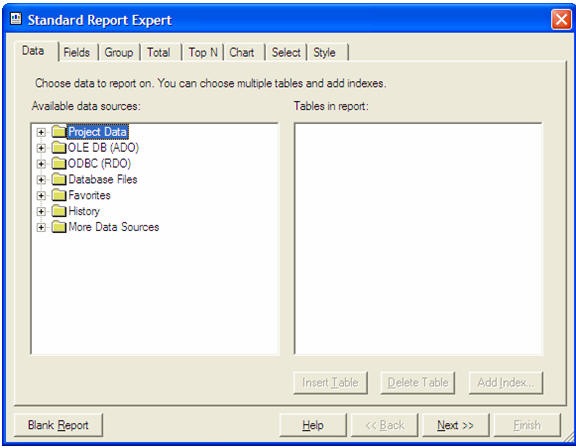
Figure 3. Standard Report Expert wizard
Adding a Data Source
Now our next step is to link a data source to the wizard. There are different ways to link a data source to the wizard. The simplest way is to click on the OLE DB(ADO) tree item in Figure 3.
Clicking on OLE DB(ADO) item launches OLE DB Provider dialog where you can select a data source as you can see in Figure 4.
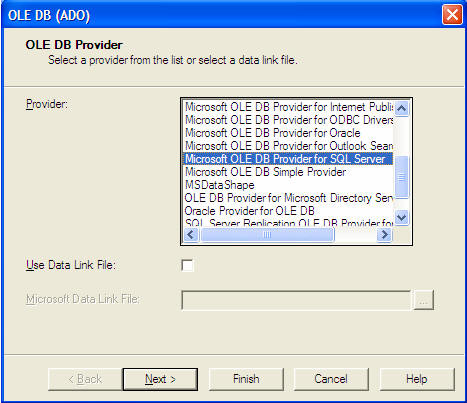
Figure 4. OLE DB Provider dialog
Now on the OLE DB Provider, you can select a provider. I select Microsoft OLE DB Provider for SQL Server. If you do not have access to SQL Server, you can select Access or other data providers.
After select Microsoft OLD DB Provider for SQL Server, you will see the Next button is activated on the wizard.
The Next button allows you to provide the connection information about a data source. As you can see in Figure 5, we select Northwind database.
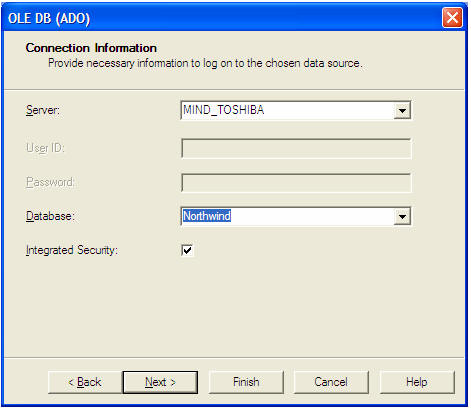
Figure 5. Connection Information dialog
Now you can click the Finish button.
This option adds the Northwind database to the list and if you expand the database item, you will see the database tables.
Now on this page, I select Customers table and add it by clicking Insert Table button. Now you can see the table listed in the right list box. See Figure 6.
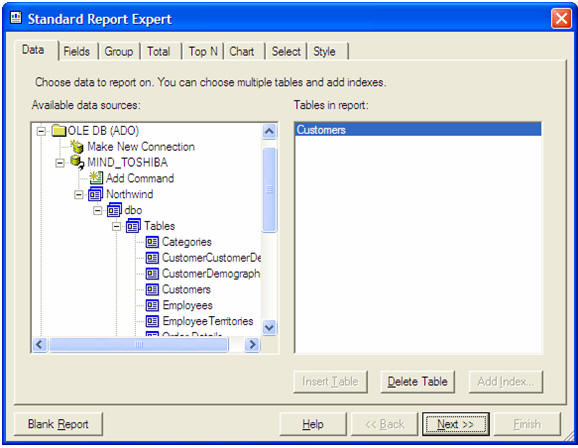
Figure 6. Northwind database tables
Now click on Next button which moves to the Fields tab. On this page, you can select what field you want to use in the report. For simplicity, I add only 5 columns to the report CustomerId, CompanyName, ContactName, ContactTitle, and City. See Figure 7. On this page, you can change the heading of a column by selecting a column and changing its name in the Column Heading text box.
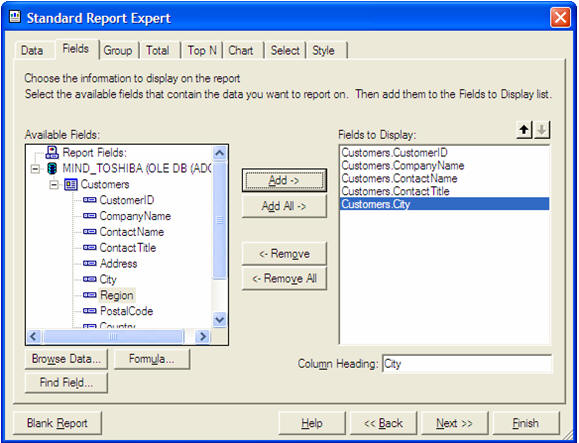
Figure 7. Adding columns to report
Now we can continue through different pages but we will stop here. Click Finish here. This option adds the report with all columns to the project. The final report file looks like Figure 8.
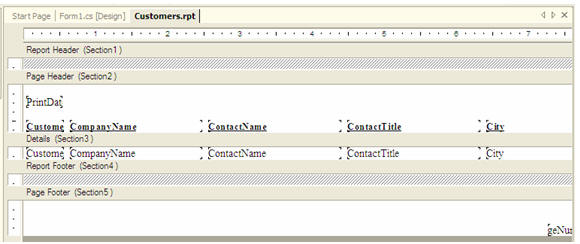
Figure 8. Customers.rpt
Adding a Crystal Report Viewer Control
Now our next step is to add Customers.rpt to the Form. For this, we need to make sure the size of the Form is big enough to fit the report. So you may want to go ahead and modify the size of Form.
After resizing the Form, we need to add Crystal Report Viewer from Toolbox to the Form. Simply drag the Crystal Report Viewer control from Toolbox to the Form and resize it accordingly. My final Form looks like Figure 9.
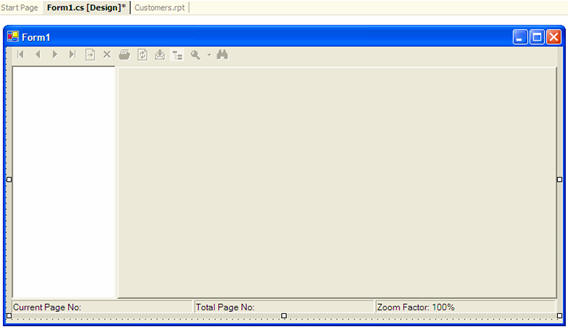
Figure 9. Form with Crystal Report Viewer
Attaching Report to Crystal Report Viewer Control
The last step is to attach Customers.rpt to Crystal Report Viewer control. For this, we need to set the ReportSource property of Crystal Report Viewer control. On the Forms load event handler, we create an Instance of Customers class, and set it as the ReportSource property of Crystal Report Viewer control.
Just write the following two bold lines on your Forms load event handler.
private void Form1_Load(object sender, System.EventArgs e)
{
Customers custReport = new Customers();
crystalReportViewer1.ReportSource = custReport;
} Now compile and run the project. The output looks like Figure 10. Now you can see the report with data. With the help of Crystal Report Viewer, you can select from various options such as zoom in, zoom out, print, move next, move last, move previous, and move first.
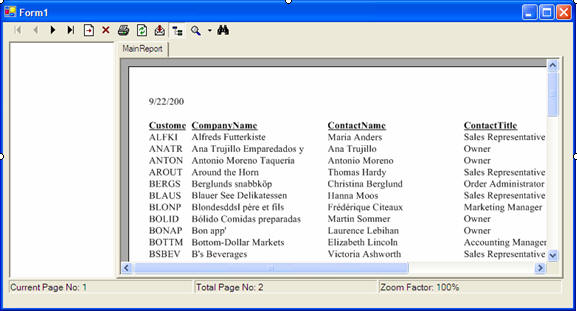
Figure 10. The final report
Adding a Report to a Project
Crystal Report is a part of Add New Item templates available in Visual Studio. To add a report to the project, add a new item by Right Clicking on the project in Solution Explorer and selecting Add->Add New Item->Crystal Report as you can see in Figure 1. I change the name of the report to Customers because we will be displaying customers related information from Northwind database.
Now click the Open button.
Figure 1. Adding a Report to the Project
The next step is to select the report document type from Crystal Report Gallery. As you can see from Figure 2, Crystal Report Gallery provides three options Using the Report Expert, As a Blank Report, or From an Existing Report.
For our first application, lets keep all options as default. I will be discussing rest of the options in my following articles.
Figure 2. Selecting a report type.
By clicking the OK button adds Customers.rpt file to the project and launches Standard Report Expert wizard as you can see in Figure 3, where you can select a data source. The Standard Report Expert wizard has 8 different tabs. I will discuss these tabs in more details in my following articles. The main purpose of this article is to show you how to create your first report in a few simple and quick steps.
Figure 3. Standard Report Expert wizard
Adding a Data Source
Now our next step is to link a data source to the wizard. There are different ways to link a data source to the wizard. The simplest way is to click on the OLE DB(ADO) tree item in Figure 3.
Clicking on OLE DB(ADO) item launches OLE DB Provider dialog where you can select a data source as you can see in Figure 4.
Figure 4. OLE DB Provider dialog
Now on the OLE DB Provider, you can select a provider. I select Microsoft OLE DB Provider for SQL Server. If you do not have access to SQL Server, you can select Access or other data providers.
After select Microsoft OLD DB Provider for SQL Server, you will see the Next button is activated on the wizard.
The Next button allows you to provide the connection information about a data source. As you can see in Figure 5, we select Northwind database.
Figure 5. Connection Information dialog
Now you can click the Finish button.
This option adds the Northwind database to the list and if you expand the database item, you will see the database tables.
Now on this page, I select Customers table and add it by clicking Insert Table button. Now you can see the table listed in the right list box. See Figure 6.
Figure 6. Northwind database tables
Now click on Next button which moves to the Fields tab. On this page, you can select what field you want to use in the report. For simplicity, I add only 5 columns to the report CustomerId, CompanyName, ContactName, ContactTitle, and City. See Figure 7. On this page, you can change the heading of a column by selecting a column and changing its name in the Column Heading text box.
Figure 7. Adding columns to report
Now we can continue through different pages but we will stop here. Click Finish here. This option adds the report with all columns to the project. The final report file looks like Figure 8.
Figure 8. Customers.rpt
Adding a Crystal Report Viewer Control
Now our next step is to add Customers.rpt to the Form. For this, we need to make sure the size of the Form is big enough to fit the report. So you may want to go ahead and modify the size of Form.
After resizing the Form, we need to add Crystal Report Viewer from Toolbox to the Form. Simply drag the Crystal Report Viewer control from Toolbox to the Form and resize it accordingly. My final Form looks like Figure 9.
Figure 9. Form with Crystal Report Viewer
Attaching Report to Crystal Report Viewer Control
The last step is to attach Customers.rpt to Crystal Report Viewer control. For this, we need to set the ReportSource property of Crystal Report Viewer control. On the Forms load event handler, we create an Instance of Customers class, and set it as the ReportSource property of Crystal Report Viewer control.
Just write the following two bold lines on your Forms load event handler.
private void Form1_Load(object sender, System.EventArgs e)
{
Customers custReport = new Customers();
crystalReportViewer1.ReportSource = custReport;
} Now compile and run the project. The output looks like Figure 10. Now you can see the report with data. With the help of Crystal Report Viewer, you can select from various options such as zoom in, zoom out, print, move next, move last, move previous, and move first.
Figure 10. The final report
No comments:
Post a Comment