Friday 29 June 2012

RSS Feed data fetch in Asp.net web application


Here we will see how to read RSS Feed data  and  show it on our web site.

To start with on we need to know from where we are going read RSS feed data. 
In this example, we will read RSS feed data from blogger.com site, where recent posts are available.
Let’s say there is a blog spot as http://yyyyyyy.blogspot.com then RSS feed data would be available at http://yyyyyyy.blogspot.com/rss.xml. So this is the source data for us to work with.
Now start with code part:
1. First lets add DataGrid to our web page, with one template column as shown below
<%# DataBinder.Eval(Container.DataItem, “title”) %>
2. In our page load, lets declare XMLTextReader object with & this will take RSS FEED URL. 
In this example I am using my blogspot url
XmlTextReader reader = new XmlTextReader(”http://TechTeraByte.blogspot.com/rss.xml“);
3. We will declare Dataset
DataSet ds = new DataSet();

4. To read XML data & read into DS lets use below code
ds.ReadXml(reader);

5. As we have dataset object filled up with RSS feed data. Lets assign Dataset to datagrid as below

myPosts.DataSource = ds;
myPosts.DataBind();

6. Dataset object would contain properties in the form of Link & Title, which we have used in our .aspx code
 i.e. step1

7. Now execute the code,,,,,, END

Using THEME and SKINS Asp.net

n this article we will discuss about how to create website with the help of using SKIN & THEME.
1. Create a new web site


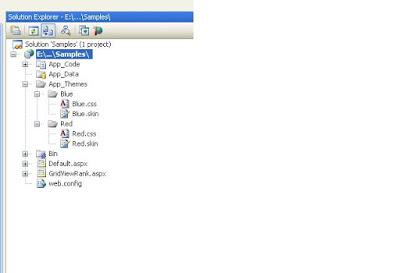
2. In solution explorer right click the Web site as shown in the below screen & select “ADD ASP.NET folder” - Theme


3. Add Theme say Blue as shown in above screen.

4. Right click on Blue theme - Add New Item - Select SKIN file - Name it as “Blue.skin”

5. Right click on Blue theme - Add New Item - Select CSS file - Name it as “Blue.CSS”

6. Repeat steps 3, 4, 5 for Red themes

7. Open Blue.CSS & paste this code
body {background-image:url('../../Images/blue.jpg'); }

8. Open Blue.SKIN & paste this code

9. Open Red.CSS & paste this code
body {background-image:url('../../Images/red.jpg'); }

10. Open Red.SKIN & paste this code


11. Now add THEME.ASPX to the web site: right click website - Add New Item - Select Web Form - Name it as Theme.aspx & paste this code


12. To see the above effect we can do at page level or Site level
a. Page Level : We need to either go to each page directive & add the Theme name that we want to use as shown below
<%@ Page Language="C#" AutoEventWireup="true" CodeFile="Theme.aspx.cs" Theme="Blue" Inherits="Theme" %>

b. Site Level : Go to web.config & look for Page Tag under System.Web tag & add the below code


13. Execute the page & see the impact by changing the theme in web.config or at page level

14. We can also override above setting by using Profiling. Go to web.config & add the below code under System.Web tag

15. Now got to Theme.aspx.cs file & add the below code in Page_PreInit event
protected void Page_PreInit(object sender, EventArgs e)
{
Page.Theme = Profile.MyTheme.ToString();
}

16. When you execute the page after adding above code you can see Blue theme is overwritten by Red theme.

Web.config Conflict: Overriding root Application Web.Config Section


Whenever we have applications created as follows:
App1 is root application with its local web.conf as web config 1
App2 is another application configured under root application App1 with its local web.config web config 1
rootwebconfig
When application configured in this fashion we have web.config conflict for IIS. So to overcome this issue we may need to do to fix this issue.
You can add the element with the “inheritInChildApplications” attribute to the root web.config. This attribute will prevent child applications inherit specified configuration from the root web.config.
The attribute must be placed in the section of the web.config. It looks like this:

Thursday 28 June 2012

Using the ASP.NET Repeater Control Article


In this article, I’ll show you how I used it to create the left side menu for my own site, which looks like this:
I store the menu categories in a table called “Sub_Category” in SQL Server, so that if I ever need to add one, I just add it to the table and it will appear on the menu. There are two fields in the table: Sub_Category_ID, and Sub_Category_Text.
STEP 1 — CREATE THE PAGE AND INSERT THE REPEATER CONTROL

The Repeater control allows you to create templates to define the layout of its content. The templates are:
  • ItemTemplate — Use this template for elements that are rendered once per row of data.

  • AlternatingItemTemplate — Use this template for elements that are rendered every other row of data. This allows you to alternate background colors, for example.

  • HeaderTemplate — Use this template for elements that you want to render once before yourItemTemplate section.
  • FooterTemplate — Use this template for elements that you want to render once after your ItemTemplatesection.
  • SeperatorTemplate — Use this template for elements to render between each row, such as line breaks.
Here is a part of the Web Form (subcategories.aspx) that contains the Repeater:
  1. ....  
  2. <asp:Repeater ID="catlist" runat="server">  
  3. <HeaderTemplate>  
  4. <tr>  
  5. <td class="imgspace">  
  6. <img src="Images/areas.jpg" width="91" height="28" class="bigtext">  
  7. </td>  
  8. </tr>  
  9. </HeaderTemplate>  
  10. <ItemTemplate>  
  11. <tr>  
  12. <td>  
  13. <div align=center>  
  14. <asp:HyperLink class="text"  
  15. NavigateUrl="<%# "mainframeset.aspx?CatType=" +  
  16. DataBinder.Eval(Container.DataItem,"Sub_Category_ID")%>"  
  17. Text="<%#DataBinder.Eval(Container.DataItem, "Sub_Category_Text")%>"  
  18. runat="server" target="mainFrame" ID="Hyperlink1" NAME="Hyperlink1"/>  
  19. <br></div>  
  20. </td>  
  21. </tr>  
  22. </ItemTemplate>  
  23. <FooterTemplate>  
  24. <tr>  
  25. <td>  
  26. </td>  
  27. </tr>  
  28. </FooterTemplate>  
  29. </asp:Repeater>  
  30. ....  
The Repeater has a name of “catlist“. It uses the HeaderTemplate to print out the Areas image. It then uses the ItemTemplate to display a Hyperlink control that has our data in it. We’ll come back to this in Step Two.
The FooterTemplate is not necessary, but I put it in here for consistency.
STEP 2 — GET THE DATA
Now let’s look at the data retrieval. Here is the Page_Load event in the Code Behind file.
  1. private void Page_Load(object sender, System.EventArgs e)  
  2. {  
  3. SqlConnection conDotNet = new SqlConnection  
  4. "Server=xxxxxxx;UID=xxxx;PWD=xxxxx;Database=DotNetGenius");  
  5. string sSQL = "Select sub_category_id, sub_category_text  
  6. from Sub_Category";  
  7. SqlCommand cmd = new SqlCommand(sSQL, conDotNet);  
  8. conDotNet.Open();  
  9. SqlDataReader dtrCat = cmd.ExecuteReader();  
  10. catlist.DataSource = dtrCat;  
  11. catlist.DataBind();  
  12. }  
The first five lines open a database connection and retrieve the contents of the Sub_Category table. The last two lines bind our Repeater control to the DataReader. Now, let’s look again at the ItemTemplate section:
  1. <ItemTemplate>  
  2. <tr> <td> <div align=center>  
  3. <asp:HyperLink class="text"  
  4. NavigateUrl="<%# "mainframeset.aspx?CatType=" +  
  5. DataBinder.Eval(Container.DataItem,"Sub_Category_ID")%>"  
  6. Text="<%#DataBinder.Eval(Container.DataItem, "Sub_Category_Text")%>"  
  7. runat="server" target="mainFrame" ID="Hyperlink1" NAME="Hyperlink1"/>  
  8. <br></div></td></tr>  
  9. </ItemTemplate>  
Once the DataBind method of the Repeater control is called, ASP.NET will loop through the DataReader and populate the Repeater with the data we specify. The Databinder.Eval method uses reflection to parse and evaluate a data-binding expression against an object at run time, in this case the object is our Repeater. So this line of code:
  1. NavigateUrl="<%# "mainframeset.aspx?CatType=" +  
  2. DataBinder.Eval(Container.DataItem,"Sub_Category_ID")%>"  
will render the contents of the "Sub_Category_ID" field for each row in the DataReader.
If you spend much time with ASP.NET, you will certainly be using this control often. I hope you find it handy! -james haron

Crystal Report

To follow this article, first create a Windows application by selecting File->New->Project->Visual C# Projects->Windows Application template from Visual Studio .NET project templates. I give my project name IntroToCR.
Adding a Report to a Project
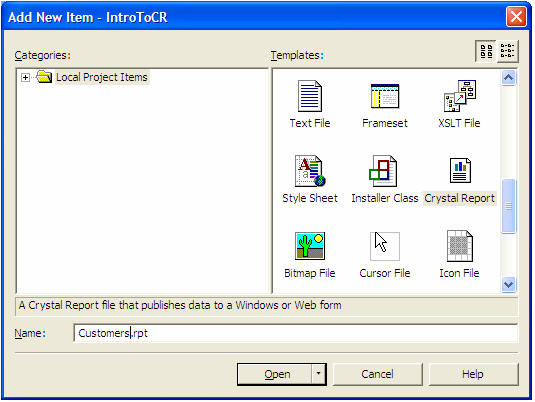
Crystal Report is a part of Add New Item templates available in Visual Studio. To add a report to the project, add a new item by Right Clicking on the project in Solution Explorer and selecting Add->Add New Item->Crystal Report as you can see in Figure 1. I change the name of the report to Customers because we will be displaying customers related information from Northwind database. 
Now click the Open button.

Figure 1. Adding a Report to the Project
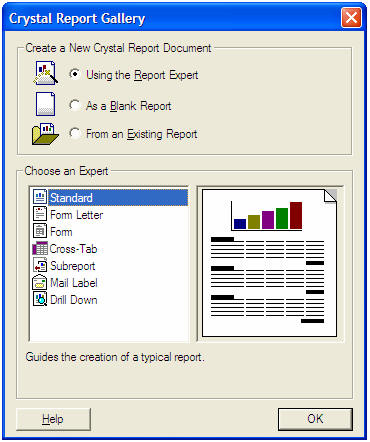
The next step is to select the report document type from Crystal Report Gallery. As you can see from Figure 2, Crystal Report Gallery provides three options Using the Report Expert, As a Blank Report, or From an Existing Report.
For our first application, lets keep all options as default. I will be discussing rest of the options in my following articles. 

Figure 2. Selecting a report type.
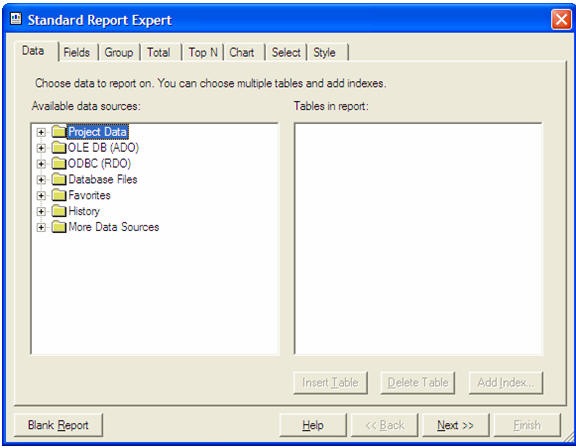
By clicking the OK button adds Customers.rpt file to the project and launches Standard Report Expert wizard as you can see in Figure 3, where you can select a data source. The Standard Report Expert wizard has 8 different tabs. I will discuss these tabs in more details in my following articles. The main purpose of this article is to show you how to create your first report in a few simple and quick steps.

Figure 3. Standard Report Expert wizard
Adding a Data Source
Now our next step is to link a data source to the wizard. There are different ways to link a data source to the wizard. The simplest way is to click on the OLE DB(ADO) tree item in Figure 3. 
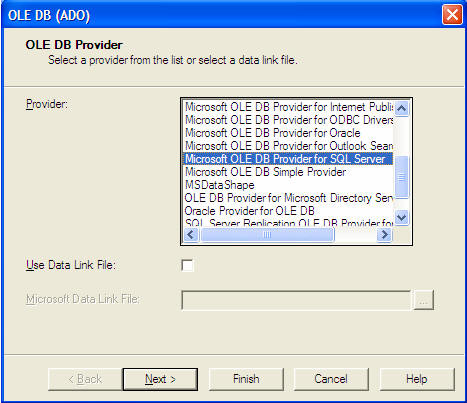
Clicking on OLE DB(ADO) item launches OLE DB Provider dialog where you can select a data source as you can see in Figure 4.

Figure 4. OLE DB Provider dialog
Now on the OLE DB Provider, you can select a provider. I select Microsoft OLE DB Provider for SQL Server. If you do not have access to SQL Server, you can select Access or other data providers. 
After select Microsoft OLD DB Provider for SQL Server, you will see the Next button is activated on the wizard. 
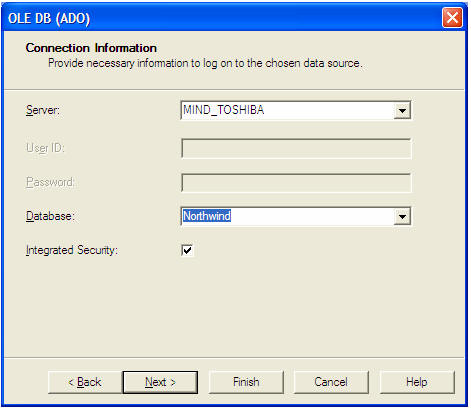
The Next button allows you to provide the connection information about a data source. As you can see in Figure 5, we select Northwind database.

Figure 5. Connection Information dialog
Now you can click the Finish button.
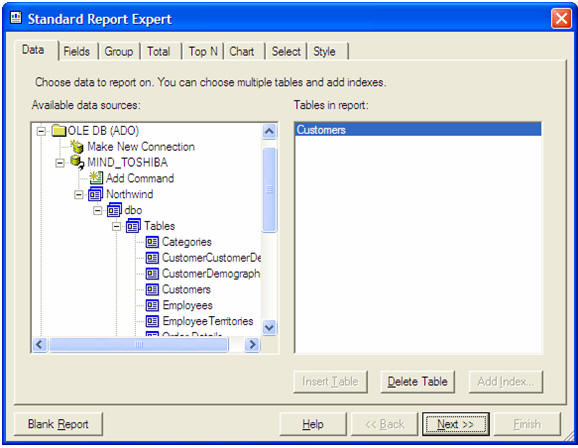
This option adds the Northwind database to the list and if you expand the database item, you will see the database tables. 
Now on this page, I select Customers table and add it by clicking Insert Table button. Now you can see the table listed in the right list box. See Figure 6.

Figure 6. Northwind database tables
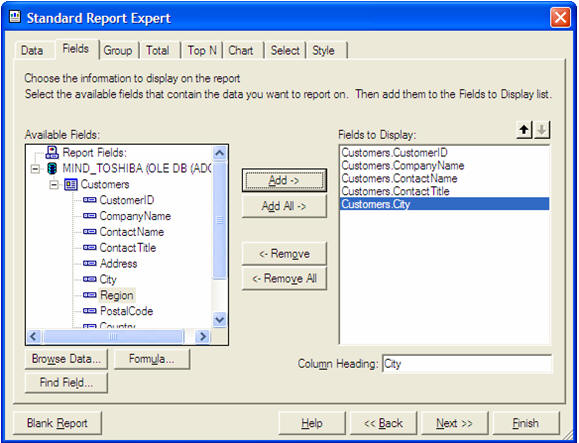
Now click on Next button which moves to the Fields tab. On this page, you can select what field you want to use in the report. For simplicity, I add only 5 columns to the report CustomerId, CompanyName, ContactName, ContactTitle, and City. See Figure 7. On this page, you can change the heading of a column by selecting a column and changing its name in the Column Heading text box. 

Figure 7. Adding columns to report
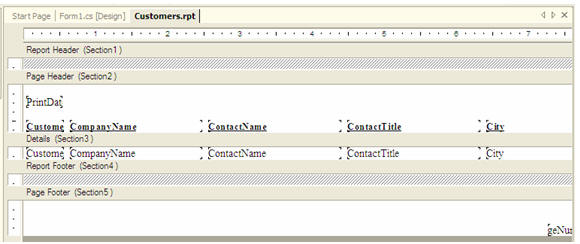
Now we can continue through different pages but we will stop here. Click Finish here. This option adds the report with all columns to the project. The final report file looks like Figure 8.

Figure 8. Customers.rpt
Adding a Crystal Report Viewer Control
Now our next step is to add Customers.rpt to the Form. For this, we need to make sure the size of the Form is big enough to fit the report. So you may want to go ahead and modify the size of Form.
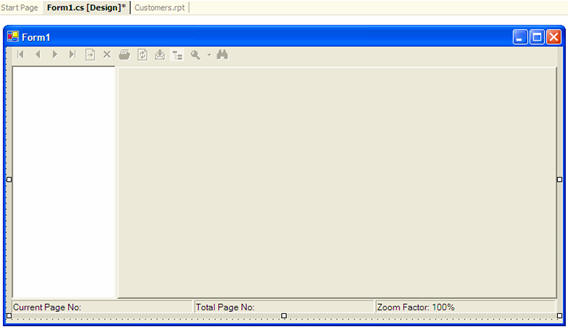
After resizing the Form, we need to add Crystal Report Viewer from Toolbox to the Form. Simply drag the Crystal Report Viewer control from Toolbox to the Form and resize it accordingly. My final Form looks like Figure 9.

Figure 9. Form with Crystal Report Viewer
Attaching Report to Crystal Report Viewer Control
The last step is to attach Customers.rpt to Crystal Report Viewer control. For this, we need to set the ReportSource property of Crystal Report Viewer control. On the Forms load event handler, we create an Instance of Customers class, and set it as the ReportSource property of Crystal Report Viewer control. 
Just write the following two bold lines on your Forms load event handler.
private void Form1_Load(object sender, System.EventArgs e)
{
Customers custReport = 
new Customers();
crystalReportViewer1.ReportSource = custReport;
}
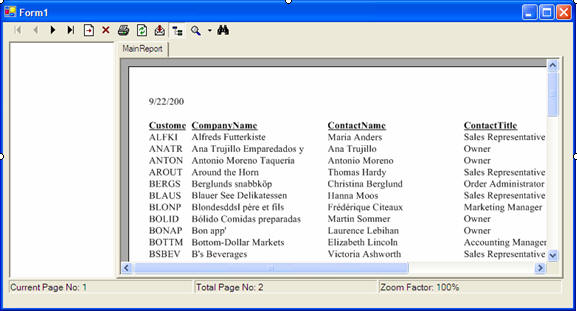
 Now compile and run the project. The output looks like Figure 10. Now you can see the report with data. With the help of Crystal Report Viewer, you can select from various options such as zoom in, zoom out, print, move next, move last, move previous, and move first.

Figure 10. The final report

ASP.NET 3.5 Directives


ASP.NET PAGE DIRECTIVE

ASP.NET provides the number of directives with the help of it we can control the behavior of ASP.NET Pages. 
We have 11 directives that we can use in our ASP.NET pages or user controls. 
We can use these directives regardless we are using Inline Coding Model or Code-Behind Model.
These directives are the commands that complier uses when the page is compiled. Format to write the directive is given below

<%@ Directive attribute= value %>

Now lets talk about the number of directives that are provided in ASP.NET one by one


PAGE DIRECTIVE

It specifies the attribute and values that are associated with Web Form Pages (.aspx).
When the compiler complies the project the page directive send command that are basically used for compiling the page. 
Some of the attributes of the page directive is :- Code File, Buffer, Culture, Debug, Language, Inherits. 

<%@ Page Language="C#" AutoEventWireup="true" CodeFile="Default.aspx.cs" Inherits="_Default" %>Master Directive
It specifies the attribute and values that are associated with Master Pages (.master).
In it, we specify the properties of the master page (templated page) that we will be conjunction with any number of content page. 
Some of the attributes of the master page directive is :- Code File, Debug, Language, Inherits, EnableView State, MasterPageFile, Src.

<%@ Master Language="C#" %>

Control Directive

It specifies the attribute and values that are associated with WebUserControl (.ascx).
It is used to bind as ASP.NET user control. 
It defines the properties to be inherited by the user control.
When the page is parsed and compiled then these values are assigned then assigned to the use control.
Some of the attributes of the master page directive is :- Code File, Debug, Language, Inherits, EnableView State, Src, ClassName, Description, CompilerOptions

<%@ Control Language="C#" ClassName="WebUserControl" %>

Import Directive

We use the import directive when we want to import any namespace in the ASP.NET page or user control.
When we import any namespace the we are able to use it's classes and interfaces.
This directive has only one attribute called "Namespace".
As much namespace we want to import the same number of import directive must be included.

<%@ Import Namespace="System.Data.SqlClient" %>

Implements Directive


We use the implements directive when we want to import any interface in the ASP.NET page or user control.
When we import any interface the we are able to use it's members.
This directive has only one attribute called "Interface".
As much interface we want to use the same number of implements directive must be included.

<%@ Implements Interface="System.Web.UI.IValidator" %>

h2>Register Directive 
When we drag and drop the web user control on the web form page then in the source page the register directive is automatically included. 
It is used to register the user control on the page so that the control can be accessed on the web form (.aspx) page.
Some of the attribute of register directive is :- assembly, namespace, src, tagname, tagprefix.

<%@ Register src="WebUserControl.ascx" tagname="WebUserControl" tagprefix="uc1" %>

Assembly Directive

It associates the assemblies to the ASP.NET page or user control so that at the compile time assembly's classes and interface is available to the page.
Attribute of the register directive is :- name and src

<%@ Assembly Name="Baljeet" Src="Baljeet.cs" %>

PreviousPageType Directive

It defines the page from which any cross-page posting originate.
It is new in the ASP.NET 3.5.
Attribute of the previouspagetpype is :- typename, virtualpath.MasterType Directive

It is applied on the Web Forms not on WebUserControl. 
When we define this directive then we get the references or members contained in the specified master page.
Attribute of the MasterType is :- typename, virtualpath.

<%@ MasterType VirtualPath="~/MasterPage.master" %>

OutputCache Directive

It control the output caching of the ASP.NET pages or user control.
Attribute of the outputcache is :- cacheprofile, duration, location, varybycontrol, varybycustom, shared.

<%@ OutputCache Duration="180" VaryByParam="None" %>

Reference Directive

It define the another ASP.NET page or user control that should be complied along with active page or control.
It support only one attribute :- virtualpath. 

<%@ Reference VirtualPath="~/WebUserControl.ascx" %>